Hands On: Your First Kafka Application in 10 Minutes or Less


Danica Fine
Senior Developer Advocate (Presenter)
Getting Started with Apache Kafka
Start Apache Kafka in the easiest, fastest way possible using Confluent Cloud in this Hello World style, beginner's quick start tutorial.
- Begin by setting up Confluent Cloud.
- Create your first Kafka topic, put some messages into it, and read your messages out using both the Confluent Cloud Console and the Confluent CLI.
- Finally, produce additional messages to your topic directly from the CLI, viewing real-time data streams in both another CLI window and the Confluent Cloud Console.
Set up Confluent Cloud
-
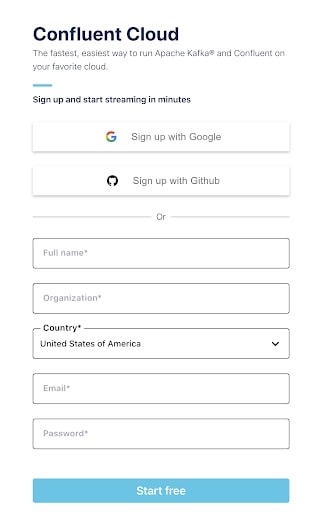
Head over to the Confluent Cloud signup page and enter your name, email address, and password.
-
Click the Start Free button. (Make sure to keep track of your password, as you'll need it to log in to Confluent Cloud later on.)
-
Watch your inbox for a confirmation email. Once you get the email, follow the link to proceed to the next step, where you should choose a Basic cluster.
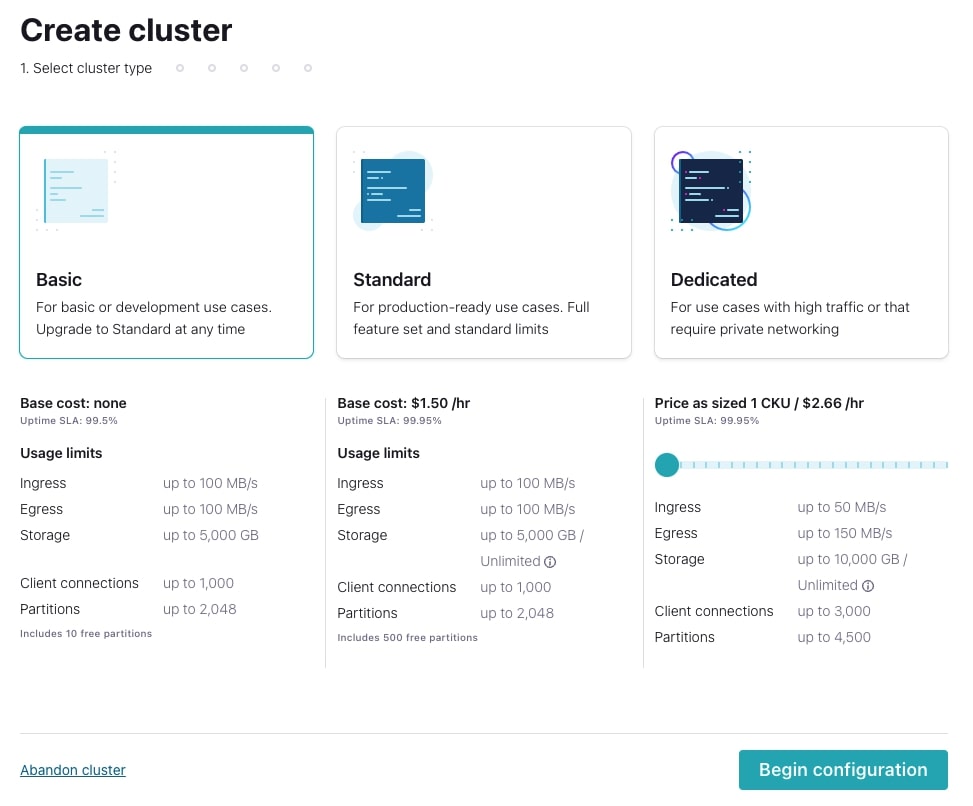


Basic clusters used in the context of this exercise won't incur much cost, and the amount of free usage that you receive along with the promo code KAFKA101 for $25 of free Confluent Cloud usage (details) will be more than enough to cover it. You can also use the promo code CONFLUENTDEV1 to delay entering a credit card for 30 days. At the end of the course, we'll walk you through how to delete the cluster to avoid any future billing. Select Begin configuration to start.
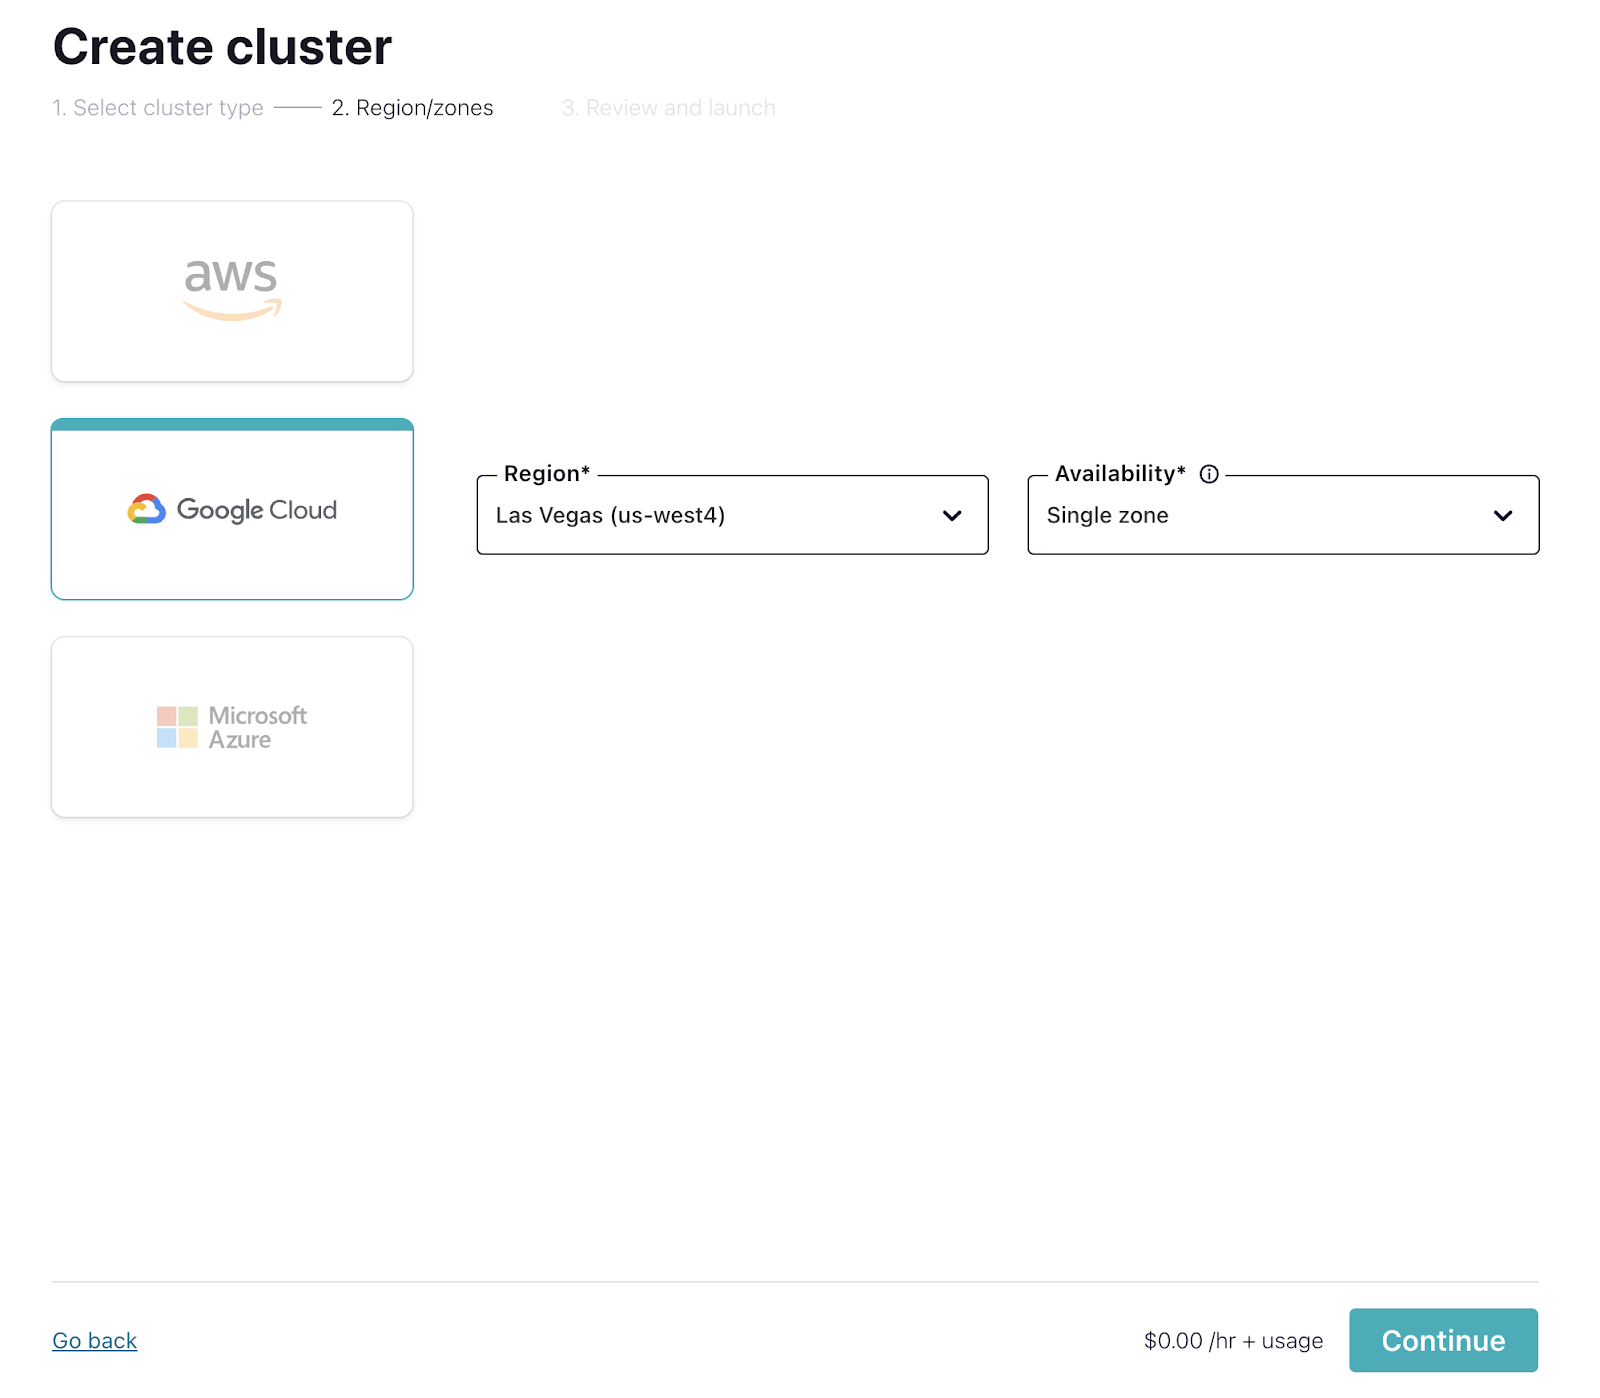
- On the next page, choose your cloud provider, region, and availability (zone). Costs will vary with these choices, but they are clearly shown on the dropdown, so you'll know what you're getting.
-
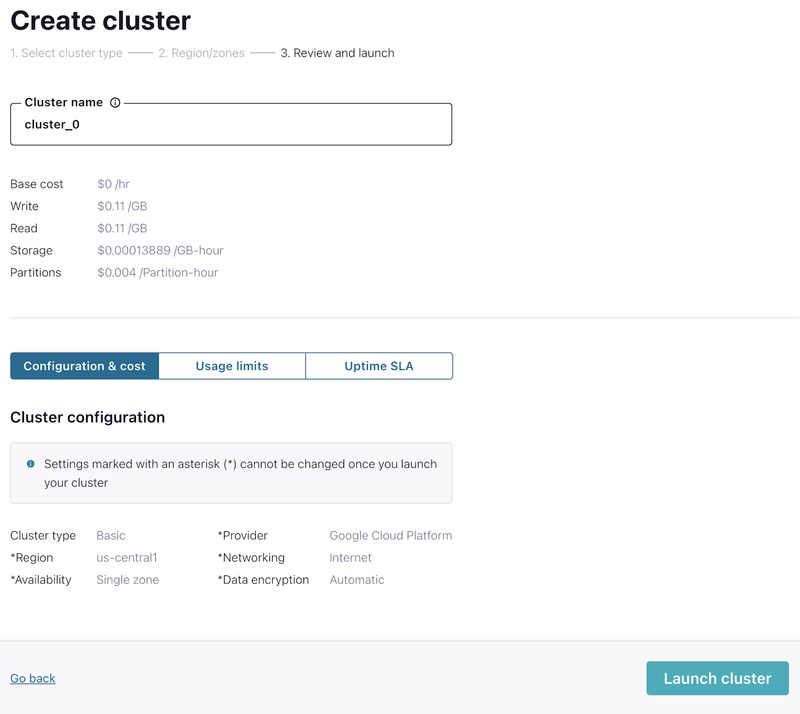
On the next screen, click Review to get one last look at the choices you've made. If everything checks out, give your cluster a name, and select Launch cluster.
-
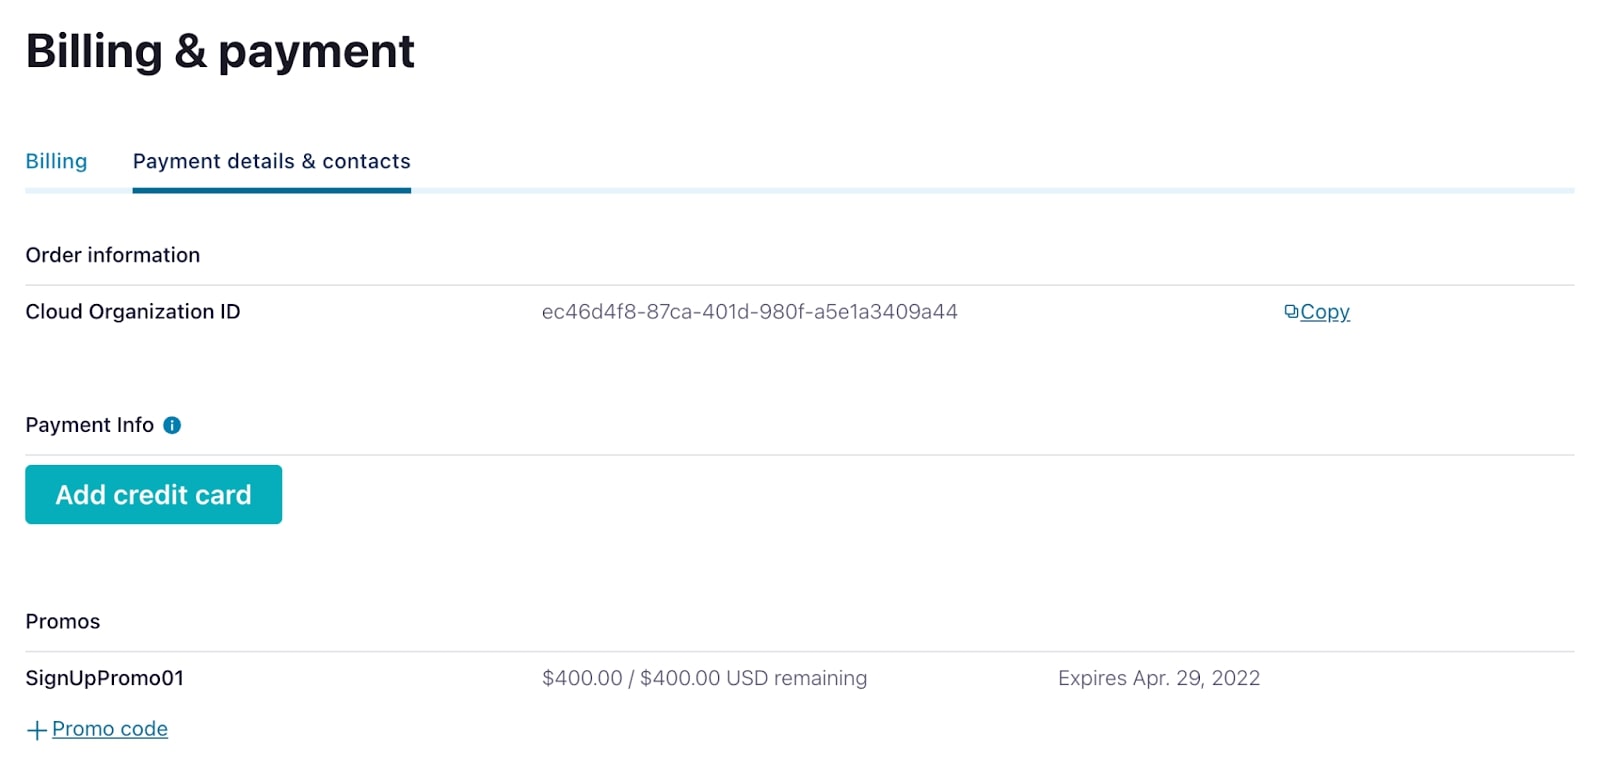
While your cluster is being provisioned, set up the KAFKA101 promo code by navigating to Billing & payment from the settings menu in the upper right. On that screen, go to the Payment details & contacts tab to enter the promo code. If you wish to avoid entering your credit card information for 30 days, hit +Promo code and enter CONFLUENTDEV1.


Create Your First Kafka Topic on Confluent Cloud
-
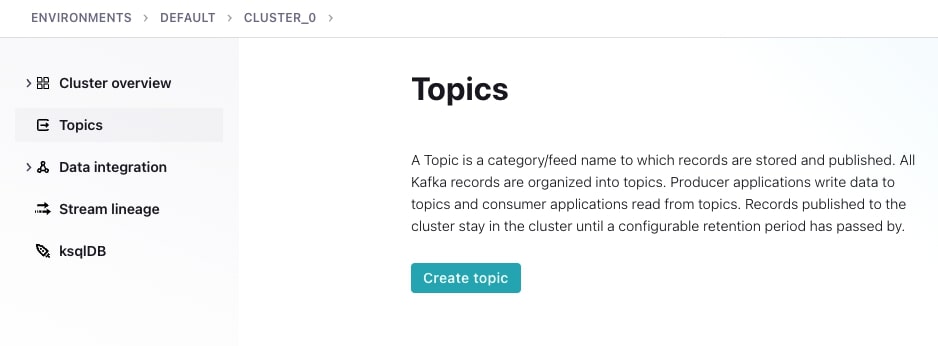
From the Confluent Cloud landing page, select the Topics tab on the left-hand side of the screen, then choose Create topic.
-
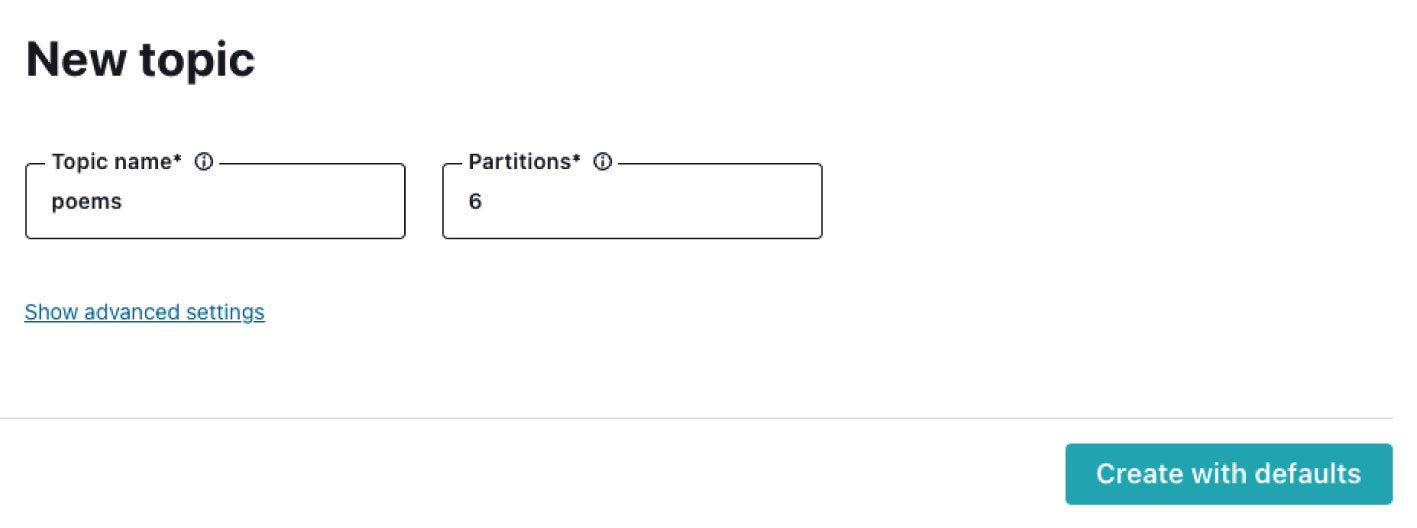
Name your topic "poems." The default number of partitions for a topic is six, which works well for today’s use case, so go ahead and select Create with defaults.
-
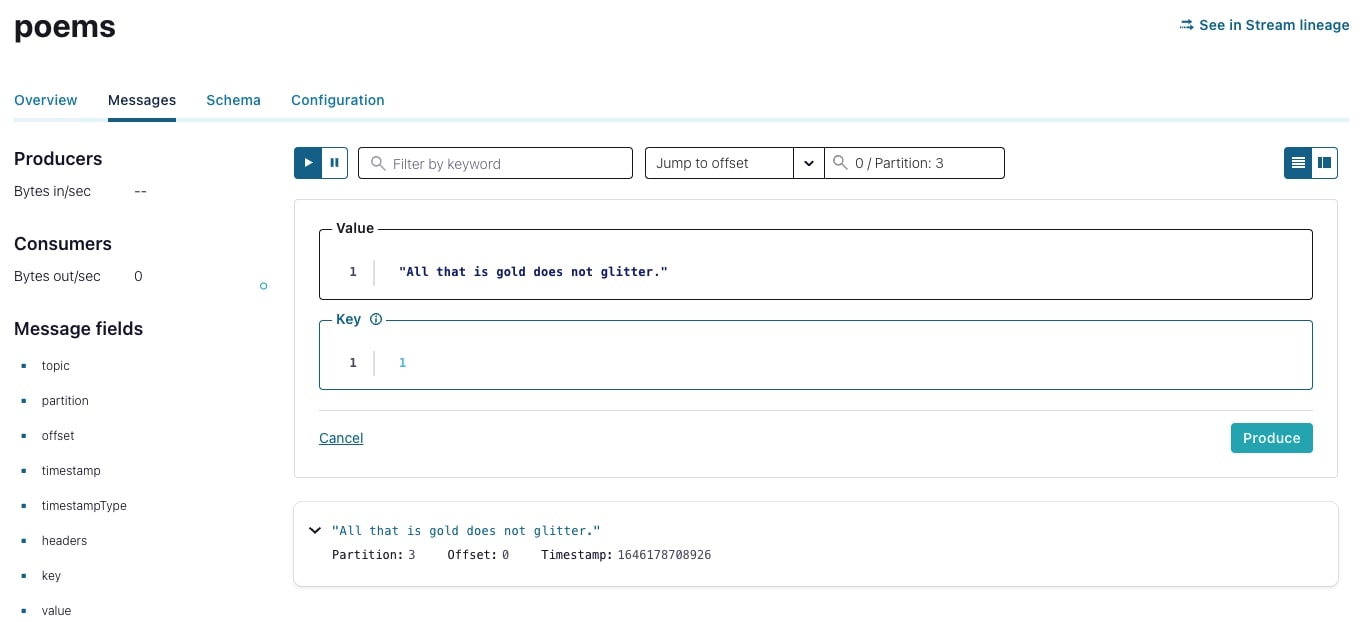
In the next screen, which displays your topic, select the Messages tab to view the contents of the topic (which is empty at this point). Select Produce a new message to this topic: This will open a UI that lets you enter a key and value for a new message (remember that a message, or an event, is a key/value pair).
-
Delete the existing data in the key and value fields, and enter "1” for the key. For the value, enter a line from a poem that may sound familiar, such as, "All that is gold does not glitter." In the Jump to offset field above, enter "0" and then select "0/Partition:3." Click Produce to add the message to your topic.
-
In a similar fashion, add the next few lines of the poem:
2, "Not all who wander are lost"
3, "The old that is strong does not wither"
4, "Deep roots are not harmed by the frost" -
The four messages will be distributed amongst the six partitions of the topic. Using the Jump to offset field, explore the remaining partitions of the topic and see the partition in which these messages were written.


Set Up the Confluent CLI
-
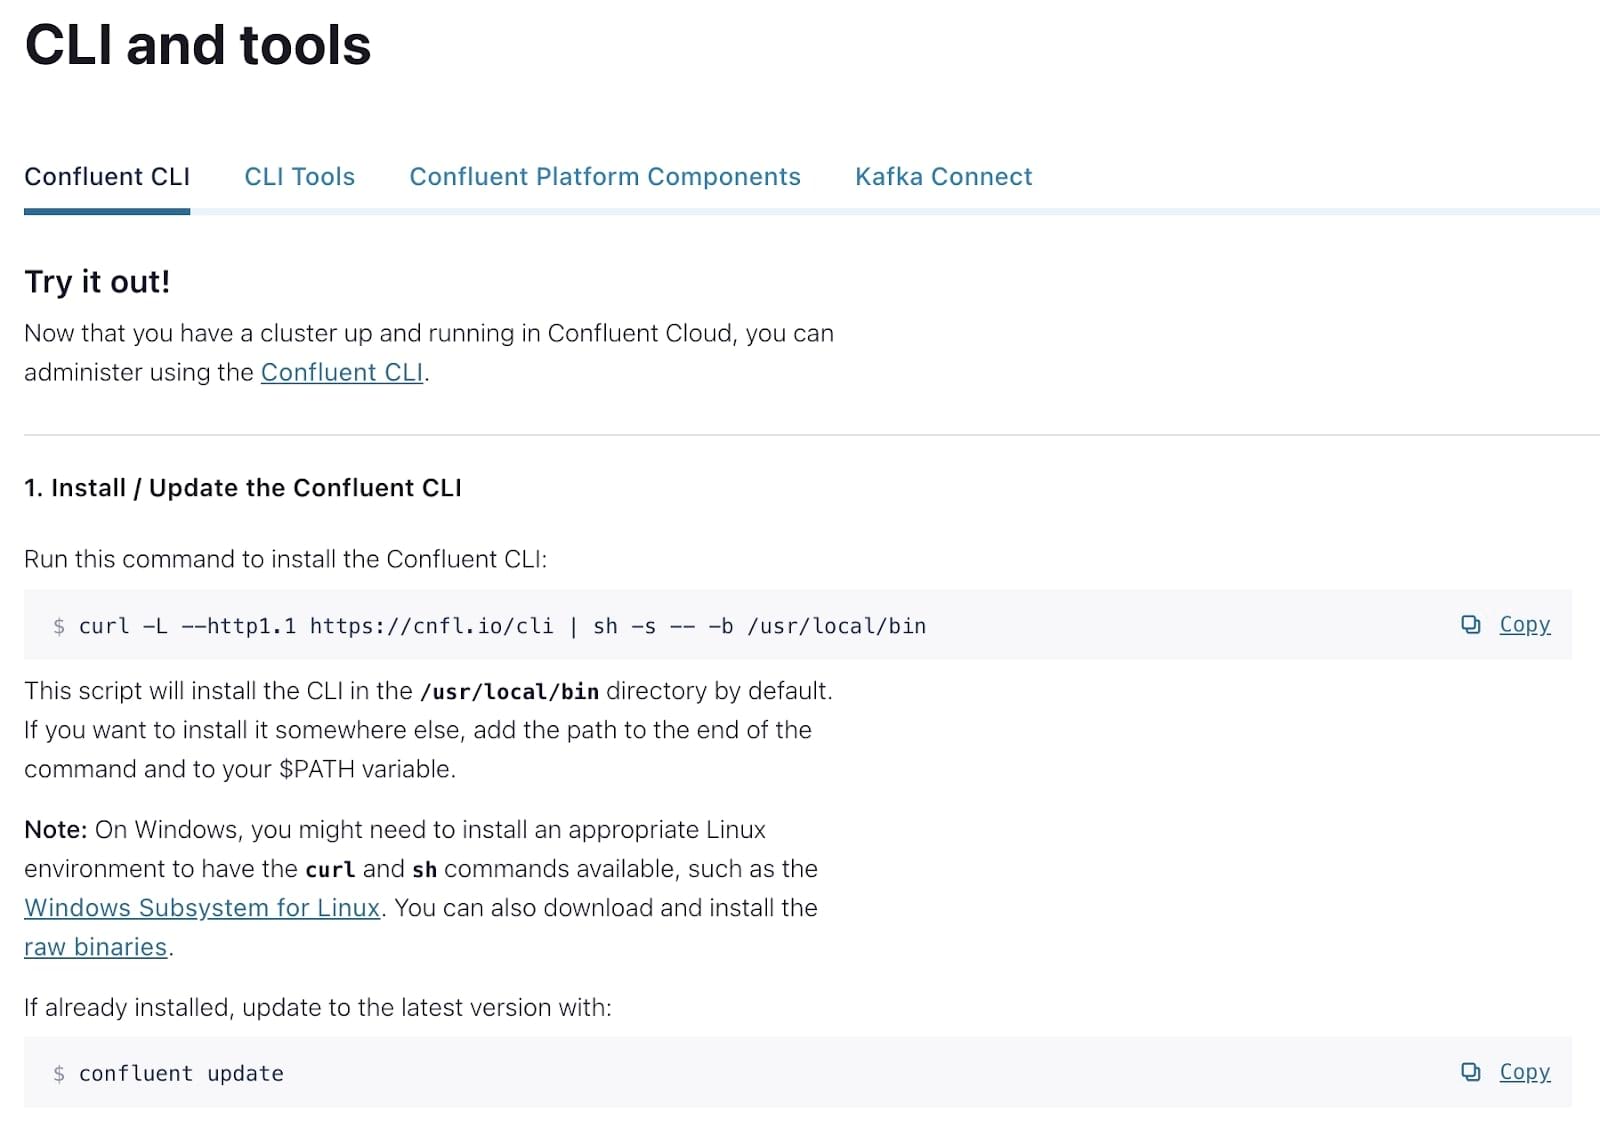
From Confluent Cloud, select CLI and tools from the lower left-hand corner of the screen. From here, you’ll find instructions on how to download and update the command line tools that we’ll be using.
-
Paste the curl command into a terminal to install the CLI.

curl -L --http1.1 https://cnfl.io/cli | sh -s -- -b /usr/local/bin- You'll receive the latest version, but note that it is a good idea once in a while to update the CLI with the following:
confluent update- From a terminal, log in to Confluent Cloud with the credentials that you used to create your Confluent Cloud account. (The --save flag saves your login details locally so that you don’t have to reenter your credentials so frequently.)
confluent login --save- Next, determine your Confluent environment by running:
confluent environment listIf your account is new, you should expect to only see one environment. Observe the output from this command, particularly the ID field.
- Using ID value from the previous step, run:
confluent environment use {ID}- Similarly, list out all of the Kafka clusters available to you using the following:
confluent kafka cluster listAgain, observe the ID that’s output. Then set the Kafka cluster by running:
confluent kafka cluster use {ID}- In order to communicate with our Kafka cluster, we need to provide an API key and secret for the CLI to use. Using the cluster ID from step 6, run:
confluent api-key create --resource {ID}This command will output an API key and secret; save these securely somewhere. To tell the CLI to use the API key, gather the cluster ID along with the API key and execute:
confluent api-key use {API Key} --resource {ID}Now your CLI is set up and ready to use!
Produce and Consume Using the Confluent CLI
If you have followed this exercise chronologically, you now have a topic with events on Confluent Cloud, as well as an authenticated CLI. Now you can consume from Confluent Cloud in your CLI and also produce to Confluent Cloud from your CLI.
- From a terminal window, list out all of the topics available to you:
confluent kafka topic listYou should see the poems topics that we created earlier. 2. Consume messages from the poems topic.
confluent kafka topic consume --from-beginning poemsThe --from-beginning flag tells the consumer to start from the earliest known offset on the topic, i.e., the earliest message. Leave this consumer running in the terminal window. 3. From another terminal window, begin to produce more messages to the topic. Execute the produce command with the --parse-key flag to automatically read both keys and values separated by the “:” symbol.
confluent kafka topic produce poems --parse-keyWhen prompted, enter the following strings as written:
	5:"From the ashes a fire shall awaken"
	6:"A light from the shadows shall spring"
	7:"Renewed shall be blad that was broken"
8:"The crownless again shall be king"- Observe the messages as they’re being output in the consumer terminal window.
- Navigate to Confluent Cloud. From the poems topic overview page, select the Messages tab. In the Jump to offset field, enter "0" and select various partitions to observe where the new messages have been written.
And that's it! If you've followed this exercise all the way through, you accomplished a number of things: You signed up for Confluent Cloud and created a cluster, created a topic, added messages to the topic using the web console, installed the CLI and created an API key, and finally used the CLI producer and consumer. Phew!
With that, you are well on your way to building great things with Confluent Cloud. Continue learning by following along in the remaining modules and exercises.
Use the promo codes KAFKA101 & CONFLUENTDEV1 to get $25 of free Confluent Cloud storage and skip credit card entry.
Be the first to get updates and new content
We will only share developer content and updates, including notifications when new content is added. We will never send you sales emails. 🙂 By subscribing, you understand we will process your personal information in accordance with our Privacy Statement.
Hands On: Your First Kafka Application in 10 Minutes or Less
So now that you know a little bit more about what Apache Kafka is, without wasting any more time, let's take it for a test drive. But first, we'll need a Kafka cluster. Confluent Cloud is a great resource that provisions a Kafka cluster in seconds, allowing you to get started quickly and really hit the ground running. Within the next five minutes, you'll have a ton of practical experience running and interacting with Kafka. So let's jump in. Confluent Cloud is the easiest way to get started with Apache Kafka. To use it, you'll first need to create a Confluent Cloud account. Go to the URL on the screen. There you'll enter your name, email, and password. Be sure to remember these sign in details as you'll need them to access your account later. Click the Start free button and wait to receive a confirmation email in your inbox. The link in the confirmation email will lead you to the next step where you'll be prompted to set up your cluster. You can choose between a basic, standard, or dedicated cluster. Basic and standard clusters are serverless offerings where your free Confluent Cloud usage is only exhausted based on what you use. This is perfect for what we need today. For the exercises in this course, we'll choose the basic cluster. Usage costs will vary with any of these choices, but they are clearly shown at the bottom of the screen. That being said, once we wrap up these exercises, don't forget to stop and delete any resources that you created to avoid exhausting your free usage. Click Review to get one last look at the choices you've made and give your cluster a name, then Launch. It may take a few minutes for your cluster to be provisioned. But that's it, you'll receive an email once your cluster is fully provisioned. In the meantime, let let's go ahead and leverage that promo code that we saw earlier. From Settings, choose Billing and Payment. You'll see here that you have $400 of free Confluent Cloud usage. But if you select the Payment details and contacts tab, you can either add a credit card or choose to enter a promo code. We'll enter KAFKA101 to get an additional $101 of free usage which will be more than enough to get you through these exercises. With our account set up and our Kafka cluster now provisioned, let's create a topic. As you know from the previous module, Kafka is a collection of immutable append-only logs. The primary component of storage in Kafka is called a topic which typically represents a particular data entity. Knowing how to interact with a topic is a crucial first step on your Kafka journey. From the Confluent Cloud landing page, select the Topics tab on the left-hand side of the screen, then choose Create topic. Let's call our topic poems. You'll see why in just a second. The default number of partitions for a topic is six which works well for today's use case, so go ahead and select Create with defaults. You'll then be taken to the Topic overview screen. Here you'll see high level details about the production and consumption of messages from this topic. There aren't any messages the topic for now, so this page isn't very interesting. Let's go ahead and change that. Select Messages to be taken to the message viewing screen. When data is being produced to your topic, this is a great page to reference to see that data flow in real time. From here we can select Produce a new message to this topic. This will open a UI that lets you enter a key and value for a new message. And remember that a message or an event in Kafka is treated as a key value pair. Delete the existing data in the key and value fields and enter one for key. For value, enter a line from a poem that may sound familiar. All that is gold does not glitter. Click Produce to add the message to your topic. Now before we move on, it's useful to know a bit more about partitions. While topics are the primary component for storage in Kafka, these topics are broken down into even smaller components called partitions. When you write a message to a Kafka topic, that message is actually stored in one of the topic's partitions. The partition that a message is routed to is based on the key of that message. So with that in mind, in the Jump to offset field above enter zero as the offset since we're at the beginning of the topic and then select zero partition three. You should see the message that you just wrote. In a similar fashion, we'll add the next few lines of the poem. Remember when messages are produced to a topic along with different keys, the messages may potentially be distributed to different partitions of the topic as partition is determined by key. The four messages that we just wrote will be distributed amongst the six partitions of our topic. Using the Jump to offset field, we can explore the remaining partitions of the topi and see the partition in which these messages were written. Check it out yourself. Producing to and consuming from a topic using the console is definitely convenient, but there are a number of other methods to use to produce data to a Kafka topic. For example, in practice, you'll probably be using the producer API from your application or even Kafka Connect. But for now, let's explore another manual method for writing data and check out the Confluent Cloud command line interface. Before we jump in, we need to set up the command line interface. At the bottom left-hand corner of your screen, you'll see the CLI and tools tab. From here, you'll find instructions on how to download and update the command line tools that we'll be using. Once that's ready, head back to your terminal and run confluent login -save to prompt you for your username and password. Use the same credentials you've used to create your Confluent Cloud account. Note that the save flag simply allows your credentials to be saved locally to a file for future use. Next, we need to select our environment and a cluster. First, we set the environment and then within that, the cluster. To set the environment, you'll want to know which environments are available to you. Run confluent environment list to see a list. For our purposes today, we'll use the default environment, so make note of its ID. With that environment ID in mind, we can now run the use environment command that you see here. With the environment set, we can now choose which Kafka cluster within it we'd like to use. We can see which Kafka clusters are available to us using confluent kafka cluster list. Note the cluster resource ID field of the results that are displayed. Enter it in the use Kafka cluster command as seen here. We've now told the CLI which environment and cluster to use. Before we can start producing it to the cluster, we need to provide an API key in order to connect to the cluster. Thankfully we can use the command line interface to do this as well. Using the cluster resource ID that you found earlier, you can run the create api-key command. You'll see an API key and secret printed out for you. Be sure to this securely somewhere. Next, we tell the CLI to use that key. Run the use API key command and enter the key and resource details. When that's done, we're ready to start putting some data into motion. With the command line interface setup, we can now start to interact with our Confluent Cloud cluster by consuming and producing messages. Let's first list out all of the topics available to us. From a terminal window, you can run confluent kafka topic list. You should see the poems topic. To consume messages from the beginning of the poems topic, run the topic consume command as shown here. The from-beginning flag tells the consumer to start reading messages from the earliest message in the topic. So you should see the four messages that we wrote earlier. Let's produce some more messages to the topic. Leave the terminal window with your consumer up and running and open a new terminal window. We can produce a key and value at once using the parse-key functionality. When we run the topic produce command with this flag, we can specify a colon-delimited string that the CLI will parse into both a key and value. Enter the following strings when prompted. Almost instantly after the messages are produced, you should start seeing them appear in the terminal window where your consumer is running. After doing so, return to the web interface on Confluent Cloud to see your newly produced messages. Remember to view messages in the web interface, you need to specify an offset for a given partition from which to consume. Since these are the first messages in the topic, set the offset to zero and check each partition to see where the messages were written. And that's it, if you follow this exercise all the way through, you've accomplished a number of pretty cool things. You signed up for Confluent Cloud and created your first Kafka cluster, created a topic, added messages to that topic using the web console, then you installed the CLI and created an API key, and finally used the CLI producer and consumer. With all of that out of the way, you're well on your way to building great things with Confluent Cloud. But don't forget to continue your Kafka journey and learn more about the great features that Kafka has to offer you by joining me in the following exercises, see you there.